Are Overtime Calculations related to the Pay Period?
No. The Pay Period has no bearing on Overtime Calculations. Overtime is based on the Starting Day of the Pay Week and the Overtime Calculation method selected as part of Employee Data Setup.
For example we’ll assume the Starting Day of Pay Week is set to Monday and overtime is based on 40 hours per week. Any hours that exceed 40 during a Monday – Sunday week would count as overtime. In this case the Pay Period is from the 16th-31st of the month and the 16th happens to fall on a Friday. The calendar and hours worked look like this:
Calendar


In this example there was no overtime worked during the pay period ending the 15th. The hours worked on the following day make that work week total 42 hours. The result is that 2 hours of overtime will be correctly included on the current pay check. The highlighted pay period would have 88 hours total. 86 would be straight time, and 2 would be overtime.
How do I find borrowed employees?
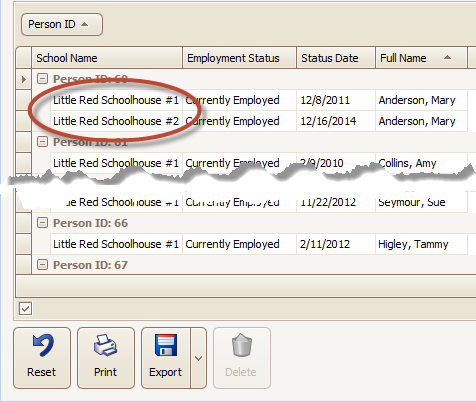
Some employees might work in more than one location in Procare. To get a list of employees that have worked in other locations:
- From the Procare Home screen, go to Corporate Reports > Data Viewer > Employee Data > Employee Contact Information.
- In the Parameters section, select today’s date for the* As Of Date* and click Create.
- Click the Choose Fields button (top right), and check only the School Name, Employment Status, Status Date, Person ID, and Full Name fields.
- Click on the column heading of Person ID, and drag it to the gray area above the screen. This will sort the list by their Person ID.
- Borrowed employees will be listed multiple times, with their school names on the left side of the screen.
How to Unborrow an Employee
If you have a borrowed employee (they work in more than one location) and you wish to unborrow them (undo their “borrowed” status), simply:
-
Go to the Employee Data module in the location that has borrowed them (their secondary location, say school #2) and look up that employee.
-
Go to their Information and Relationships screen.

-
Change their Primary School to the current school (school #2 in this example). In other words, their Primary School has been something else.
-
Click Save > Exit.
Results of Unborrowing
- The time cards for this person (at the two locations) are no longer linked together. You can no longer run a combined timecard report for them. Time cards would be printed separately from each location.
- Pay rates would be set separately at each location.
- If you use the Payroll module, the original paycheck history (with hours from both locations) would remain intact. New checks would now be issued separately from each school; the person would receive multiple checks.
- You can now move this school to another region, if that was the reason for removing their “borrowed” status.
How do I make an employee ''hidden'' or "un-hide" them?
It’s easy to mark an employee as “hidden” or change them to be visible again. Although you may hide an employee for any reason most often it is because they are no longer employed.
To mark an employee as “hidden” (or to un-hide them):
-
Look Up the Employee and:
- Click the Information & Relationships icon on the toolbar (3 people standing together)

- Or, dbl-click their name on the list of employees (left side of screen).

Note: If you can’t look up the family because they are already hidden use the Select Filter to view “All Employees” first.
- Click the Information & Relationships icon on the toolbar (3 people standing together)
-
At the Information & Relationships screen you’ll see a check box labeled “Hide Employee” (top right).
- To hide the employee check the box and the lightbulb next to it will now be grayed out.

2. To un-hide the account remove the check mark and the light bulb will turn back on.

How do I make an employee hire date report?
-
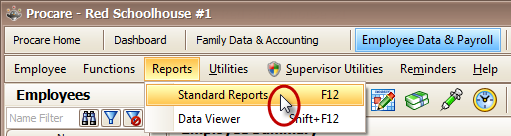
Go to the Reports > Standard Reports> Employee Data> Employment Status > Employee Work History.
-
Click the Filter button for the report (top center).
a. Click on Employment Status.
b. Select a status (usually “Currently Employed”).
c. Select a date span (for example, “Anytime Between”) and enter the date(s).
d. Click Exit.

-
At the Standard Reports screen, click Run Report (bottom right).
How to Print Employee Time Cards
It’s easy to print time cards for your child care staff. From the main screen of Employee Data & Payroll:
-
Go to Reports > Standard Reports > Employee Data > Time Card.
-
Expand the Employee Data section and then the Time Card section.
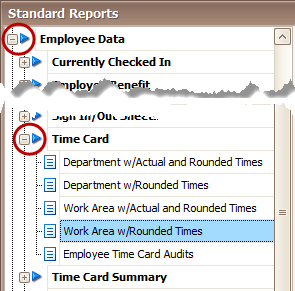
-
Choose a report, such as the one called Work Area w/Rounded Times.
-
Then select a Date Range and choose Run Report.

Learn how to sort, filter, print and export reports.
How to set up an Employee who is also a Parent
If you have Employee Data and Family Data, you may have people in you center that are in both roles. They might already have been an employee, or a parent. Here are some tips on what to do depending on their initial role at the center.
Existing Employee Becomes a Payer/Parent
-
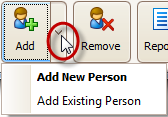
Create the new family account as you would for any new family. Since the parent you are adding already exists in Employee Data or as a Procare User, be sure to select the Add Existing Person option.
-
Continue creating the child record(s) with the classroom and enrollment status.
-
In the child’s information and relationships screen, assign the employee as a pickup person for their child.
Note: If you use Check In, the employee-parent’s registration code will work for both employee and child check in. -
If you are using billing boxes to charge tuition that has been deducted from the employee’s check, you can enter the tuition charge and payroll deduction credit in the same billing cycle.

-
If you are using Procare’s Payroll module, set up a child care withholding for the employee if needed.
Existing Parent/Payer Becomes an Employee
-
Create the new employee record as you would for any new employee. Since the employee already exists in Family Data, be sure to to select the Add Existing Person option for the employee.
 {height="" width=""}
Note: If you use Check In, the employee-parent’s registration code will work for both employee and child check in. -
If you are using Procare’s Payroll module, you may also want to set up a child care withholding for that employee. You may also perform step 4 from the section above.