
Managing attendance records is a common task for administrators. This article explains how to review, add, edit and delete sign-in/out student attendance records.
Important Note
The instructions in this article only apply to Procare Online. Attendance records cannot be edited in the Procare child care mobile app. Staff can sign-in/out students in the app.
Learn more about:
all Attendance Options for administrators
KinderSystem Texas Requirements
In September 2026, the state of Texas adopted new requirements for collecting and submitting child attendance records for subsidized child care. Procare Online has been updated to meet these requirements which include:
Photo, signature, and geolocation requirements must be collected at sign-in/out.
These requirements apply to both staff and parent/guardian sign-on/out.
These requirements cannot be changed or disabled when transmitting attendance via the KinderSystems integration.
This setting is global and cannot be configured on a per-family or per-staff basis.
Attendance Dashboard
In Procare Online, go to Student Sign-In > Attendance.
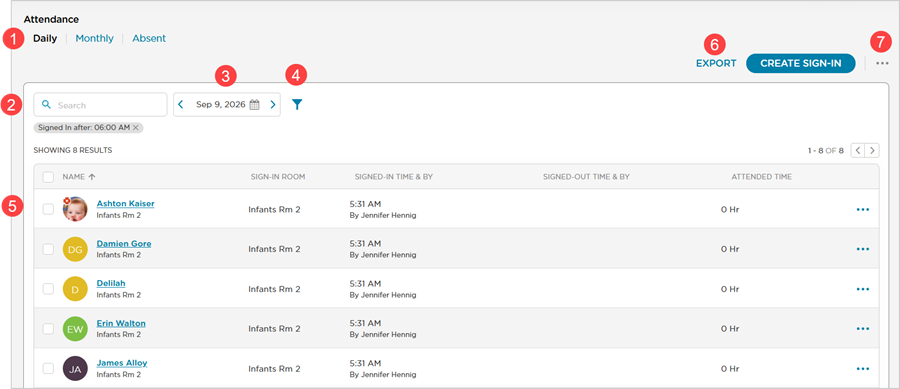
The dashboard display includes Daily, Monthly and Absent views.
Daily - attendance details for the selected day.
Monthly - attendance details include Days Attended and number of No Sign Out(s) for at a glance attendance auditing. Can be filtered by:
Weekly
Bi-weekly
Monthly
Absent - select date range to view students and their absence reasons.

Learn more about marking a student absent.
Click Filter
 and then Apply to view records sorted by:
Room
Tags
Search for individual students.
Select the date to view the associated sign-in/out attendance records.
Click Filter
and then Apply to view records sorted by:
Assigned Room | Tags | Signed-In | Signed-Out |
|---|---|---|---|
|
| Click Signed In, select:
| Click Signed In, select:
|
Individual student sign-In/out details. Click to view an attendance range for this student. See Individual Student Attendance Details below.
Click Export to generate a report of the selected data.
Learn more about Attendance Reports.
Click
 to print a sign-in sheet.
 Learn more about the sign-in sheet.
Individual Student Attendance Details
Click on any individual student to display their attendance details.
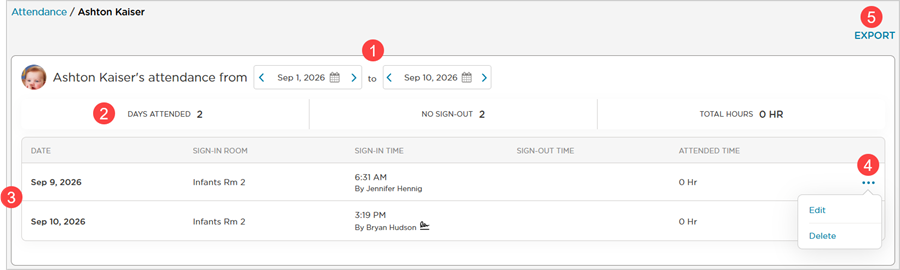
Select the date range to view the attendance records.
View the attendance summary.
View sign-in/out details and total attended time.
Click
to Edit or Delete the indvidual student record.Click Export to generate a report of the selected data.
Learn more about Attendance Reports.
Add an Individual or Multiple Sign-In/Out Attendance Records
Go to Student Sign-In > Attendance. The calendar defaults to the current day.
Click Create Sign-In.
Select Sign-In Attendance or Sign-Out Attendance.
Available options are:
an individual student or multiple students can be selected
an entire room or selectes students in that room
multiple tags can be selected
Individual Student | Entire Room | Tags |
|---|---|---|
|
|
|
 to remove a student.
Procare Child Care Mobile App Permission
If you are using the app for the first time, Procare will need access to your photos on your mobile phone.
Open the Procare child care mobile app.
Click Sign-In
 .
.Select Attendance.
Available options are:
an individual student or multiple students can be selected
an entire room or select students in that room
multiple tags can be selected
Individual Student |
|
|
|---|---|---|
| Select all or select individual students in that room.
| Select the room from the dropdown.
|
 Select All Rooms
 to switch the list from a vertical list view to a tiled view.
  to edit the date, time or room.
Tags
Tap a tag or multiple tags, when selecting the room to narrow the student list, tap < to select only by the tags.
Go to Student Sign-In > Attendance. The calendar defaults to the current day.
Click Create Sign-In.
Select Sign-In Attendance or Sign-Out Attendance.
Available options are:
an individual student or multiple students can be selected
an entire room or selectes students in that room
multiple tags can be selected
Individual Student | Entire Room | Tags |
|---|---|---|
|
|
|
Procare Child Care Mobile App Permission
If you are using the app for the first time, Procare will need access to your photos on your mobile phone.
Open the Procare child care mobile app.
Click Sign-In
.Select Attendance.
Available options are:
an individual student or multiple students can be selected
an entire room or select students in that room
multiple tags can be selected
Individual Student |
|
|
|---|---|---|
A confirmation message appears. | Select all or select individual students in that room.
A confirmation message appears. | Select the room from the dropdown.
A confirmation message appears. |
Location Capture Problems?
If the location looks incorrect, tap Try Again to update the pin. The pin cannot be dragged or manually adjusted.
Error Messages
Location is turned off - permission denied or no access
The location is required to complete the sign-in/out.
We couldn’t get your location - unavailable or timeout
A location is required to complete this sign-in/out. Tap Try Again.
The device couldn't lock onto a GPS signal in time to complete the process — this is a common issue indoors or in areas with weak signal strength. Moving closer to a window or door can help.
Tapping Try Again is the only way to proceed; this step cannot be skipped.
Edit an Individual SIgn-In/Out Attendance Record
Locate the student.
Click
.Select Edit.
Update or revise the attendance information. Changes can be made to:
Room
Signed-In/Out By
Signed-in/Out Time
KinderSystems Texas Requirements
The original Signed-In/Out By entry remains on record, but a new one can be added to update it.
Click Saved Changes.
Delete an Individual Sign-In/Out Attendance Record
Locate the student.
Click
.Select Delete.
Select Yes, Delete to continue.
Batch Edits for Sign-In/Out Attendance Records
Select the date.
Select the students.
Click the Select Batch dropdown.
Select one of the options:
Change Sign-In Room
Change Sign-In By
Change Sign-In Time
Change Sign-Out By
Change Sign-Out Time
Batch Delete
Click Update.
Automatic Attendance Sign-Out
If a student is not signed out by the end of the day, Procare can sign them out automatically.
To set this up, contact Customer Support with:
The time auto sign-out should occur
The staff name that should appear next to auto-signed-out students
Once this feature is set up, you can identify auto-signed-out students by checking the time you specified during setup. In our example, we:
set the auto sign-out time for 6pm and
the staff name as Admin
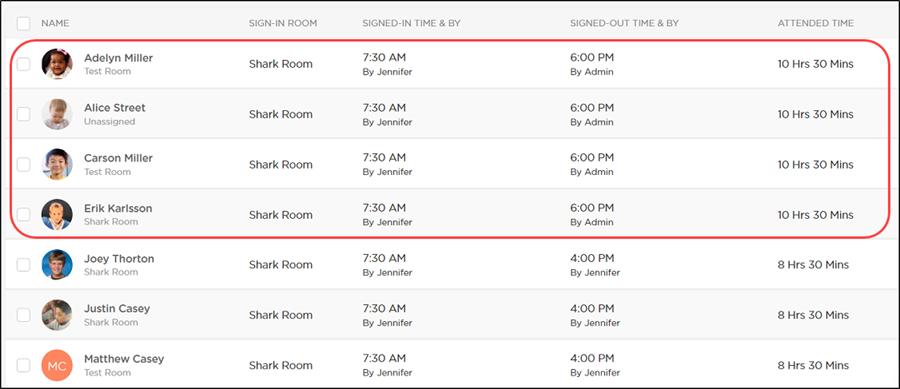
Note
There will not be a daily summary or parent alert for auto-signed-out students. Also, the students will be signed out overnight rather than at the designated time.
Learn more about student sign in/out reports.