Create custom reports based on the data in existing standard attendance reports. Custom reports make it easy to extract specific data and meet a variety of reporting needs. You can select the fields that matter most to your program and build a report that reflects exactly what you need to see. Whether you are tracking daily attendance patterns, monitoring absences or compiling data for a compliance review, custom reports give you the flexibility to build reports that are meaningful and relevant to your work.
Create a Custom Report
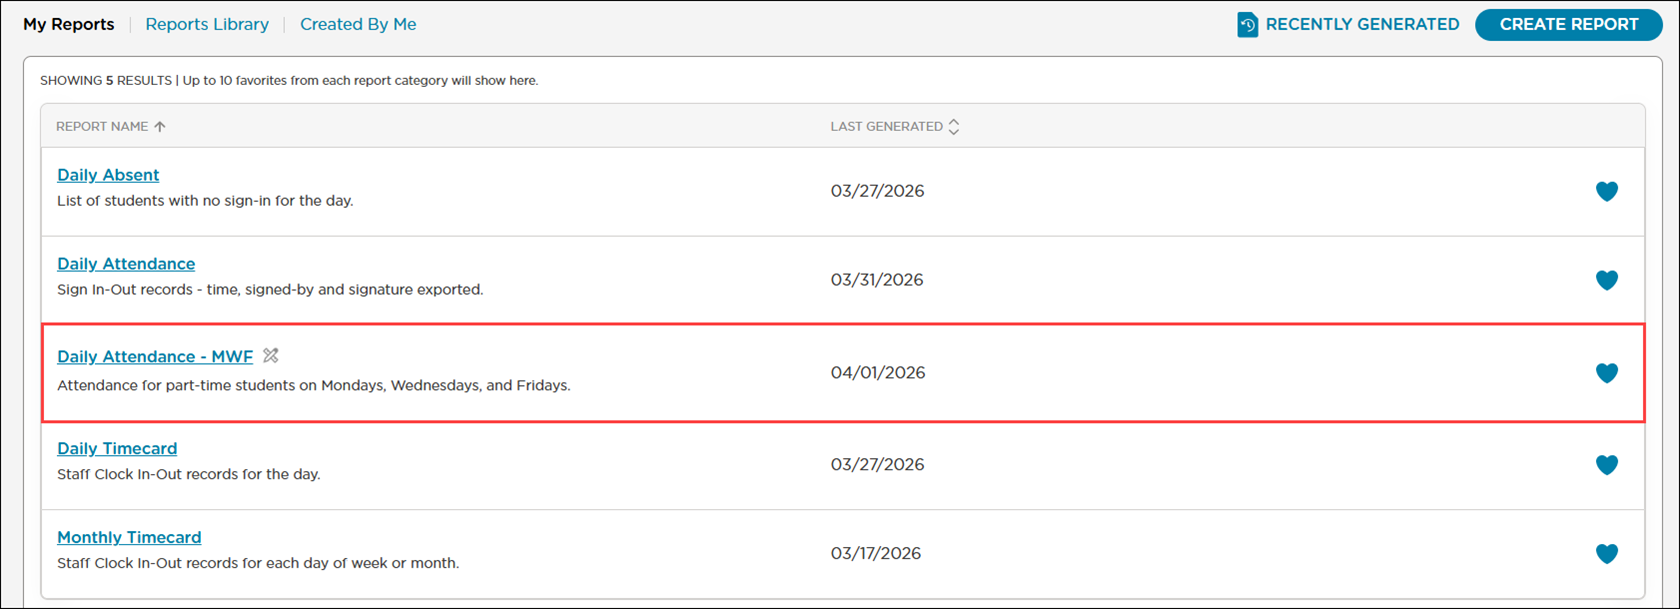
Go to Reports.
Click Create Report on any tab in the Reports window.
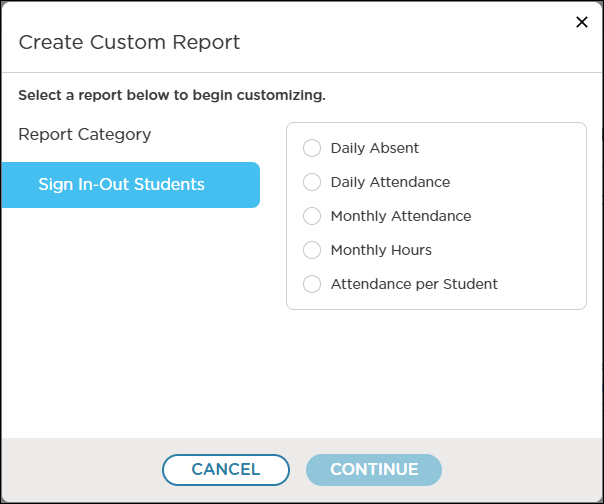
Select the report that contains the fields you want to use in your custom report. You can select one of five reports from the Sign In-Out Students report category:
Attendance per Student
Daily Absent
Daily Attendance
Monthly Attendance
Monthly Hours
Each report contains standard and unique identifier fields.
Standard Fields
Standard fields use recognizable labels and formats, making them easy to work with. Because they are are uniform throughout the system, the data you see in one report will align with related data in another, keeping your reporting accurate and reliable. When filtering and sorting on reports, you can narrow down results to find exactly what you are looking for. These fields can also help save time by allowing you to pull organized, ready-to-use information directly from the system.
Unique Identifier Fields
These fields serve as unique identifiers (IDs) within your database, meaning that each record is assigned a value that sets it apart from all other records. The primary purpose of these fields is to maintain data integrity and establish relationships between tables behind the scenes. Unlike standard fields such as names, dates or statuses, system-generated IDs do not provide meaningful information on their own for everyday tasks like tracking enrollment, reviewing attendance or pulling compliance data. As a result, you would not need to include these fields on most reports. In technical or audit-focused reports, unique identifiers can be useful for:
Troubleshooting: tracking down a specific record in your database
Data exports: ensuring accurate record matching when importing/exporting between platforms
Cross-referencing: linking related records across multiple datasets or integrations
Fields by Report
Attendance per Student Report Fields
Standard Fields
Field
Description
Attn Time (hrs)
The daily amount of time in hours the student was signed in for
Days Attended
The total number of days the student attended class for the selected date range
Early Release Reason
The reason why the student was signed out early
First Name
The student’s first name
Last Name
The student’s last name
Missed Signouts
The number of times the student was not signed out during the selected date range
Months Attended
The number of month’s the student attended class during the selected date range
Room
The room the student was signed in to
Sign In Note
The note added at sign-in from the mobile app
Sign In Time
The time the student was signed in
Sign Out Time
The time the student was signed out
Signed In By
The name of the individual who signed the student in
Signed In By Type
The type of user who signed the student in
Signed In Room
The room the student was signed in to
Signed Out By
The name of the individual who signed the student out
Signed Out By Type
The type of user who signed the student out
Status
The student’s status indicated in their profile
Total Time
The total number of hours the student attended class for during the selected date range
Weeks Attended
The total number of weeks the student attended class for during the selected date range
Unique Identifier Fields
Field
Description
Attendance ID
A unique identifier assigned to the attendance record
Internal ID
A unique identifier that can be assigned to a student
Kid ID
A unique identifier assigned to the student’s record
Primary Room ID
A unique identifier assigned to the student’s primary room
Record ID
A unique identifier that can be assigned to a student
Room ID
A unique identifier assigned to the room the student was signed in to
Signed In By ID
A unique identifier assigned to the individual who signed the student in
Signed Out By ID
A unique identifier assigned to the individual who signed the student out
Sign-in Session Teacher ID
A unique identifier assigned to the teacher associated with the sign-in/sign-out session
Daily Absent Report Fields
Standard Fields
Field
Description
Date
The date of the student’s absence
First Name
The student’s first name
Last Name
The student’s last name
Note
The Absent Note associated with the date of the student’s absence
Parent Names
The names of the student’s parent(s)/guardian(s)
Room
The room the student was absent from
Schedule
The student’s schedule
School Name
The name of the school the student was absent from
Status
The student’s status
Tags
The tag(s) assigned to the student
Unique Identifier Fields
Field
Description
Internal ID
A unique identifier that can be assigned to a student
Kid ID
A unique identifier assigned to the student’s record
Record ID
A unique identifier assigned to the attendance record
Room ID
A unique identifier assigned to the room the student was signed in to
School ID
A unique identifier assigned to the name of the school
School PLOC
A unique identifier that distinguishes the school within a corporation
Daily Attendance Report Fields
Standard Fields
Field
Description
Attn Time (hrs)
The daily amount of time in hours the student was signed in for
Early Release Reason
The reason why the student was signed out early
First Name
The student’s first name
Last Name
The student’s last name
Room
The room the student was signed in to
School Name
The name of the school the student attended
Sign In Note
The note added at sign-in from the mobile app
Sign In Time
The time the student was signed in
Sign Out Time
The time the student was signed out
Signed In By
The name of the individual who signed the student in
Signed In By Type
The type of user who signed the student in
Signed In Room
The room the student was signed in to
Signed Out By
The name of the individual who signed the student out
Signed Out By Type
The type of user who signed the student out
Status
The student’s status indicated in their profile
Tags
The tag(s) assigned to the student
Unique Identifier Fields
Field
Description
Attendance ID
A unique identifier assigned to the attendance record
Internal ID
A unique identifier that can be assigned to a student
Kid ID
A unique identifier assigned to the student’s record
Primary Room ID
A unique identifier assigned to the student’s primary room
Record ID
A unique identifier that can be assigned to a student
Room ID
A unique identifier assigned to the room the student was signed in to
School ID
A unique identifier assigned to the school the student attended
School PLOC
A unique identifier that distinguishes the school within a corporation
Signed In By ID
A unique identifier assigned to the individual who signed the student in
Signed Out By ID
A unique identifier assigned to the individual who signed the student out
Sign-in Session Teacher ID
A unique identifier assigned to the teacher associated with the sign-in/sign-out session
Monthly Attendance Report Fields
Standard Fields
Field
Description
Attn Time (hrs)
The daily amount of time in hours the student was signed in for
Early Release Reason
The reason why the student was signed out early
First Name
The student’s first name
Last Name
The student’s last name
Room
The room the student was signed in to
Schedule
The schedule specified in the student’s profile
Sign In Note
The note added at sign-in from the mobile app
Sign In Time
The time the student was signed in
Sign Out Time
The time the student was signed out
Signed In By
The name of the individual who signed the student in
Signed In By Type
The type of user who signed the student in
Signed Out By
The name of the individual who signed the student out
Signed Out By Type
The type of user who signed the student out
Status
The student’s status indicated in their profile
Tags
The tag(s) assigned to the student
Unique Identifier Fields
Field
Description
Attendance ID
A unique identifier assigned to the attendance record
Internal ID
A unique identifier that can be assigned to a student
Kid ID
A unique identifier assigned to the student’s record
Primary Room ID
A unique identifier assigned to the student’s primary room
Record ID
A unique identifier that can be assigned to a student
Signed In By ID
A unique identifier assigned to the individual who signed the student in
Signed Out By ID
A unique identifier assigned to the individual who signed the student out
Sign-in Session Teacher ID
A unique identifier assigned to the teacher associated with the sign-in/sign-out session
Monthly Hours Report Fields
Standard Fields
Field
Description
Days Attended
The number of days the student attended class during the selected date range
First Name
The student’s first name
Hours Attended
The total number of hours the student attended class during the selected date range
Last Name
The student’s last name
Missed Signouts
The number of times the student was not signed out during the selected date range
Room
The room the student was signed in to
Status
The student’s status indicated in their profile
Tags
The tag(s) assigned to the student
Unique Identifier Fields
Field
Description
Record ID
A unique identifier that can be assigned to a student
Room ID
A unique identifier assigned to the room the student was signed in to
Student Profile ID
The student’s external Student Information System (SIS) ID
Click Continue. Procare Online displays the Report Editor and a preview of the report. The Title, Description, and Selected Fields are included on the report by default.
.png)
Edit the Report
Edit the title and description as needed.
Select the fields to display on the report.
To move a field, do one of the following:
Drag and drop the field to the desired position in the Selected Fields section
Drag and drop the field column header to the desired position in the report grid
To delete a field, do one of the following:
Click ✖ on the field in the Selected Fields section
Hover over the field column header in the report grid, then click ✖
To restore the default fields and layout in the report grid, click Reset.
Save the Report
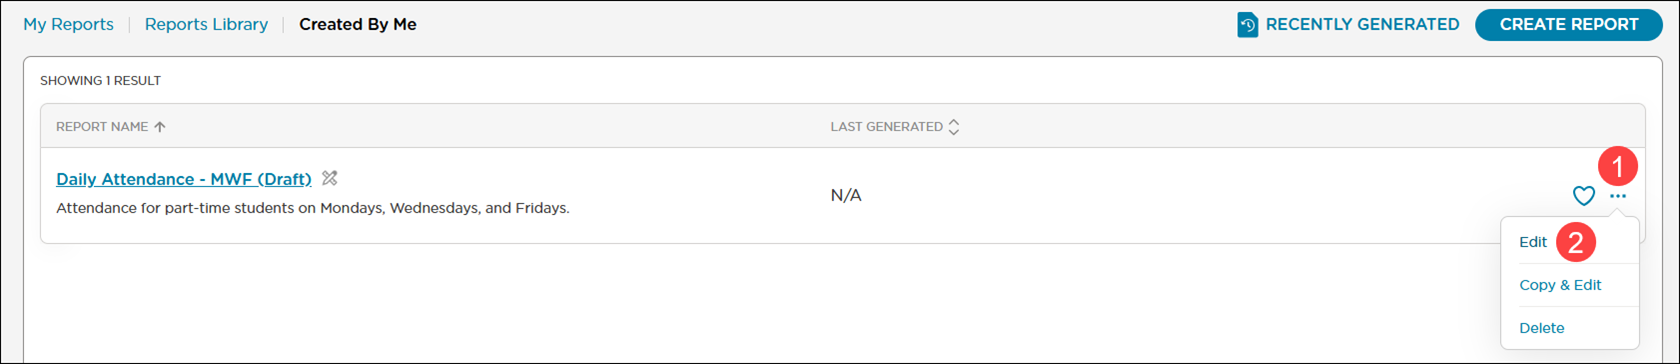
Click one of the following options to save the report. All custom reports display in the Created by Me tab.
Save as Draft
Save the report to continue editing it at a later time. When you save using this option, Procare Online appends ‘(Draft)’ after the report title to make it easy to identify your drafts in the Reports window.
To continue editing the report after saving it as a draft:
Click More Actions
 .
.Click Edit. Procare Online displays the Report Editor and a preview of the report.
Continue editing the report as needed.
Remove ‘(Draft)’ from the title when you are ready to create the report.
Click Save & Continue.
Click Save & Continue on the Save Customized Report window to confirm that you want to save the report with your changes.
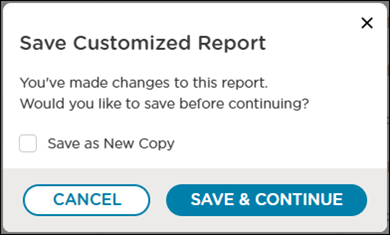
To save a copy of the report, select Save as New Copy and enter a new title and description for the copied report.
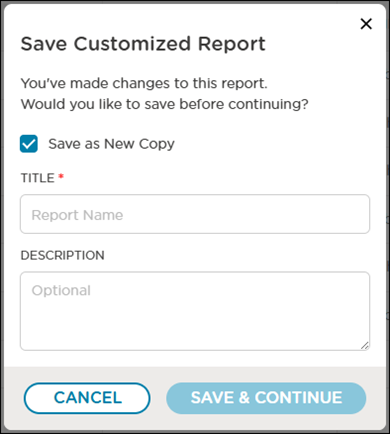
Click Save & Continue. Procare Online opens the report in a Report Viewer window with your current data.
Create & Continue
Save the report to start using it for real-time data collection.
Procare Online opens the report in a Report Viewer window with your current data.
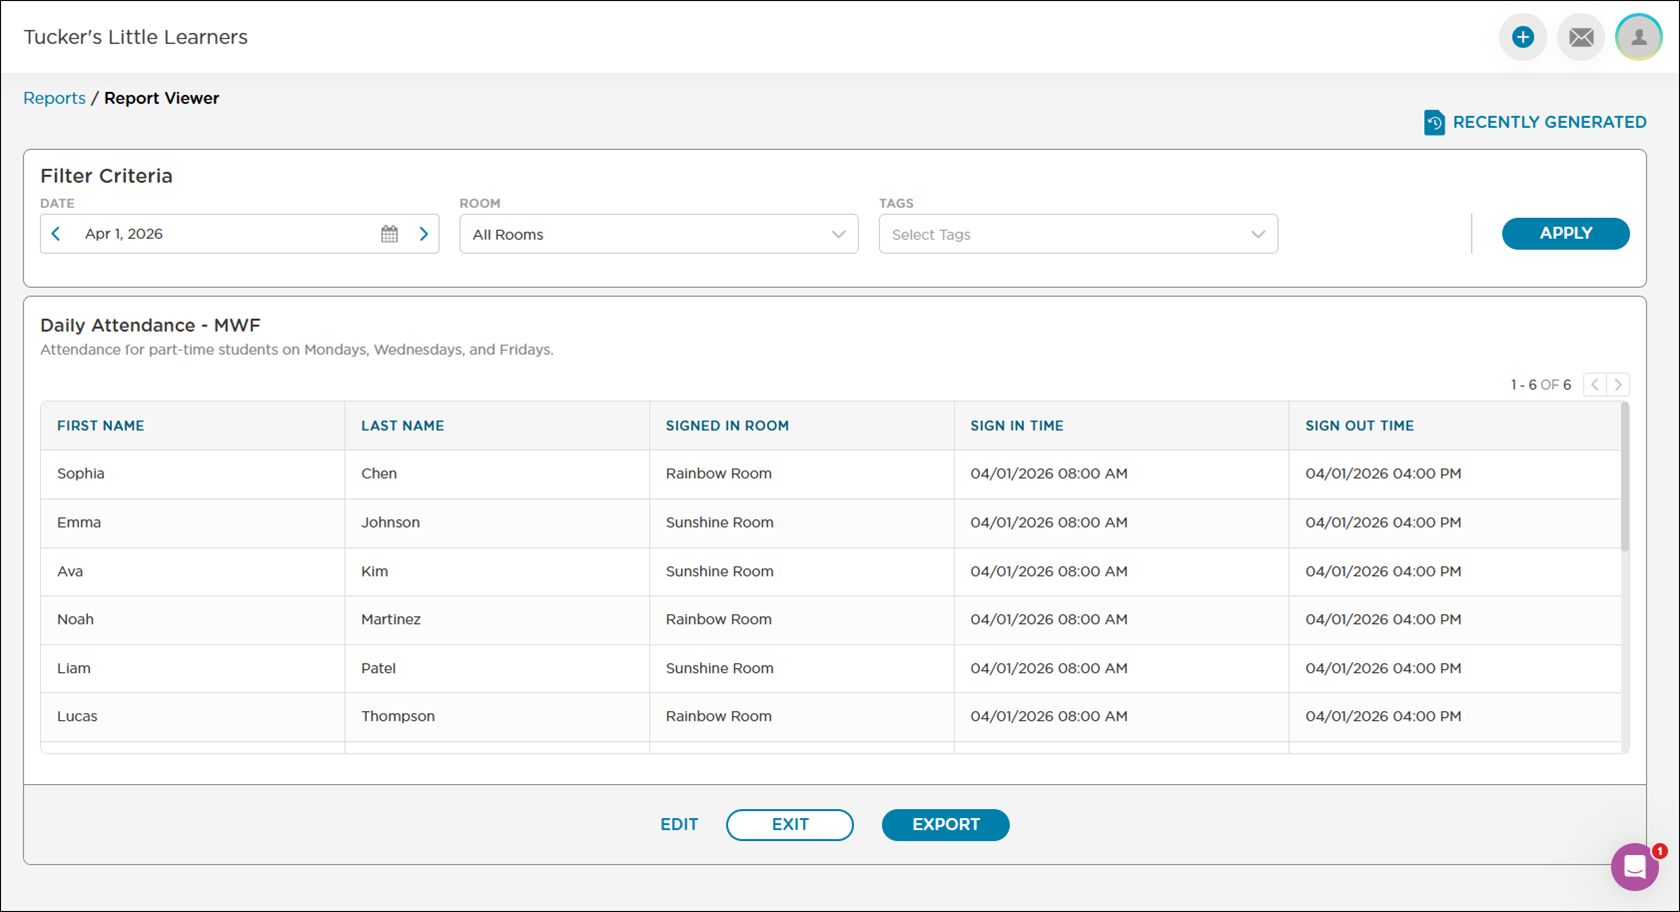
Use the Filter Criteria options to specify the data to display on the report. The filter options available depend on the report your custom report is based on.
Click Apply. The Report Viewer window updates with the applied filter criteria.
Note
If you have multiple pages of results, the Report Viewer only displays the first page. Use the left and right arrows above the grid to view other pages.
Export the Report
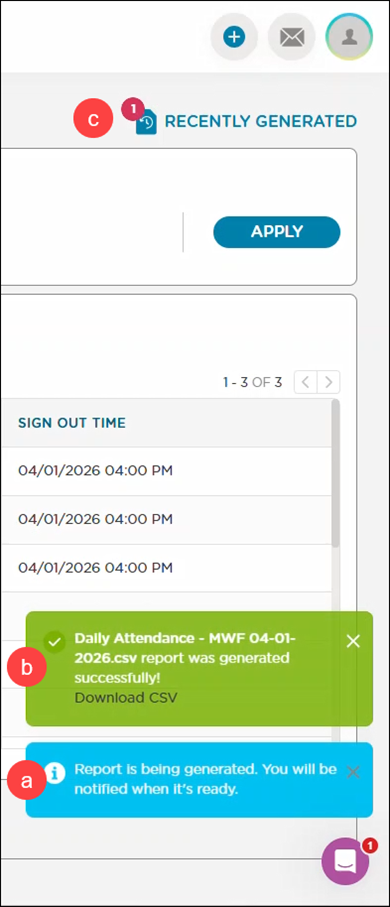
When you are ready to export the report, click Export. Procare Online displays a notification
when the report is being generated
after the report was successfully generated and
as a red indicator with the number of unopened exported files on the Recently Generated button
In general, Procare saves the exported file to your Downloads folder.
To dismiss the notification on the Recently Generated button or view recently exported reports, click Recently Generated. Procare Online opens the Recently Generated Reports window.
Click the Created by Me tab. Recently generated reports that have not been downloaded display a red indicator next to the name.
Select a format to export the report in. Procare Online saves the report to your device, stops displaying the indicator next to the name, and stops displaying the indicator on the Recently Generated button.
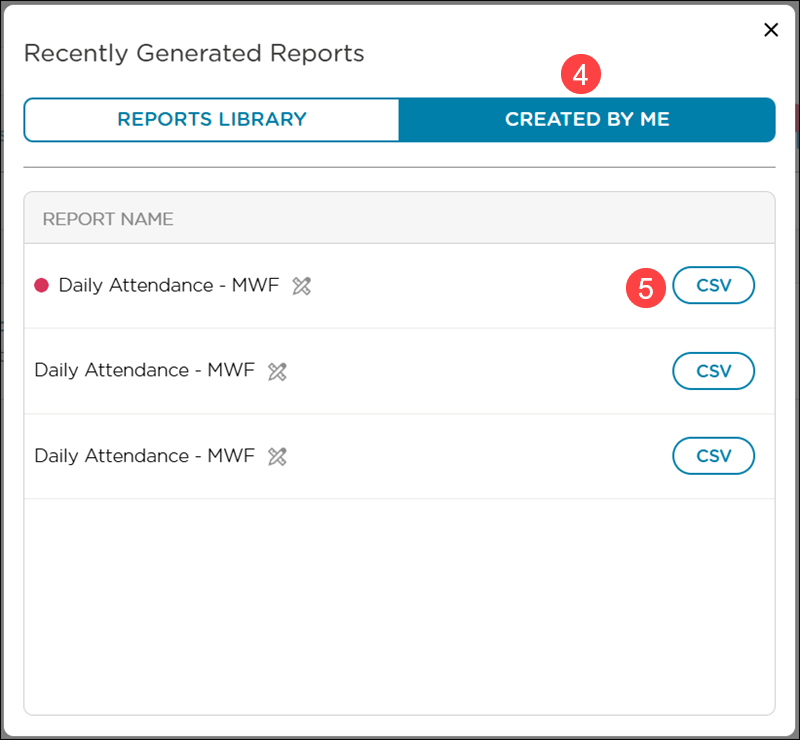
Click ✖ to close the Recently Generated Reports window.
Note
Currently, custom reports are only exported in CSV format.
View a Custom Report
Go to the Created by Me tab.
Select a report.
Select and apply filter criteria as needed.
Click Exit to return to the Created by Me tab.
View Custom Reports in the My Reports Tab
Display your custom reports in the My Reports tab for quick access.
Go to the Created by Me tab.
Click Favorite
 on the report you want to display. Procare Online displays a notification that the report was added to the My Reports tab.
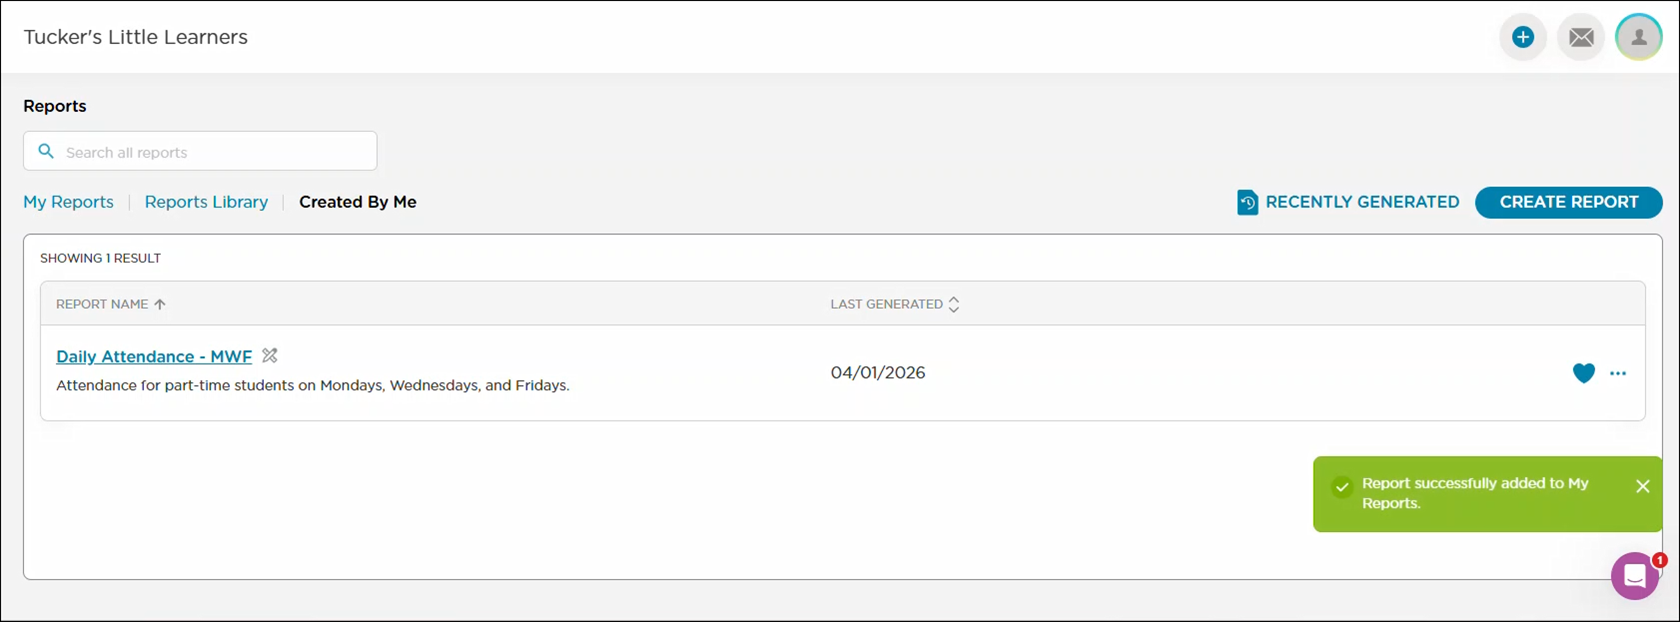
Go to the My Reports tab. Procare Online displays your custom report in the list. You can quickly identify your custom reports by the Custom Report
 symbol next to the report name.