Drop-In Enrollment Form
What is the Drop-In Form?
The Drop-In Form is a simple way to temporarily add a child to your center’s schedule, handle their meals, and make sure everyone who needs to know is notified. It’s designed to keep your records accurate and make the process easy for both staff and families.
What Can You Do with the Drop-In Form?
Using the Drop-In Form, you can:
Enroll a child for specific days
Schedule attendance with start and end times
Notify teachers and parents about the child’s temporary schedule
Automatically remove the child from enrollment and scheduling once the period ends
How to Use the Drop-In Form
Open the Form
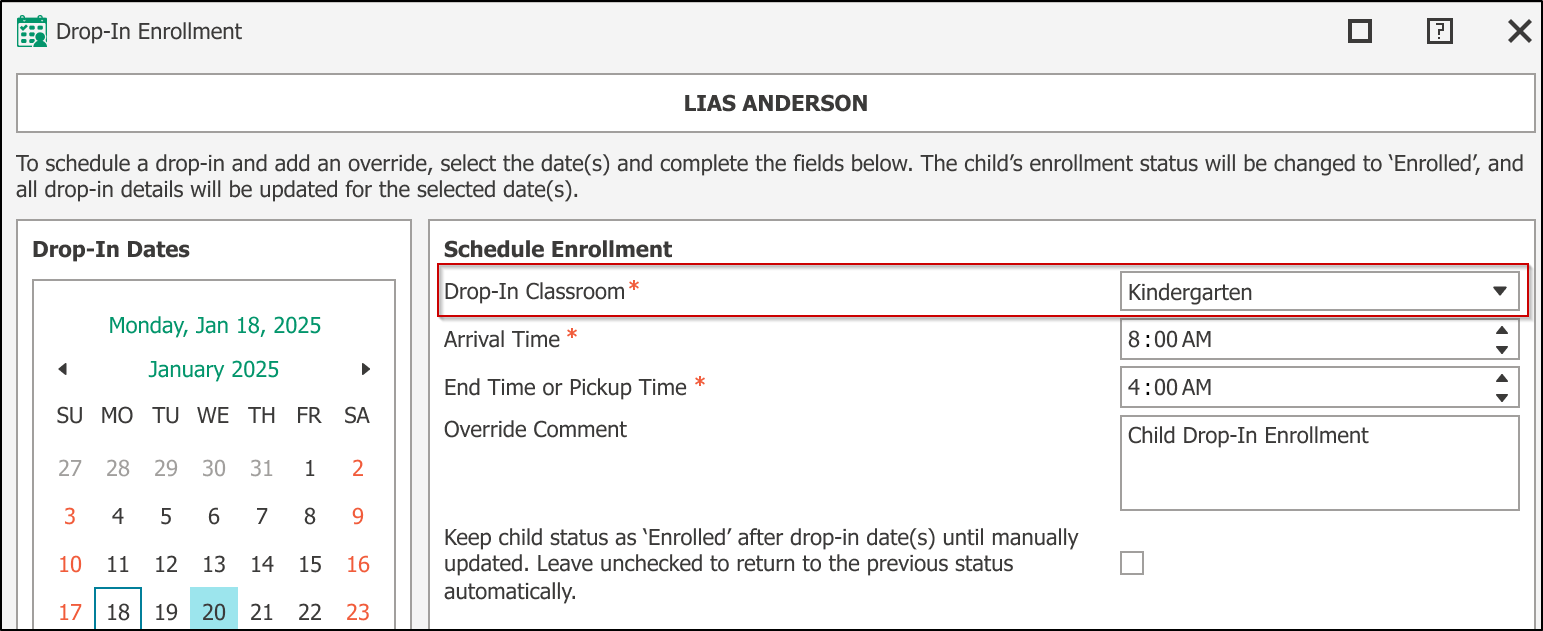
Go to the Family Data & Accounting tab and click the drop-in icon for the child you want to enroll. Or navigate to Family Data & Accounting > Drop-In Enrollment from your menu.
Select Dates & Times
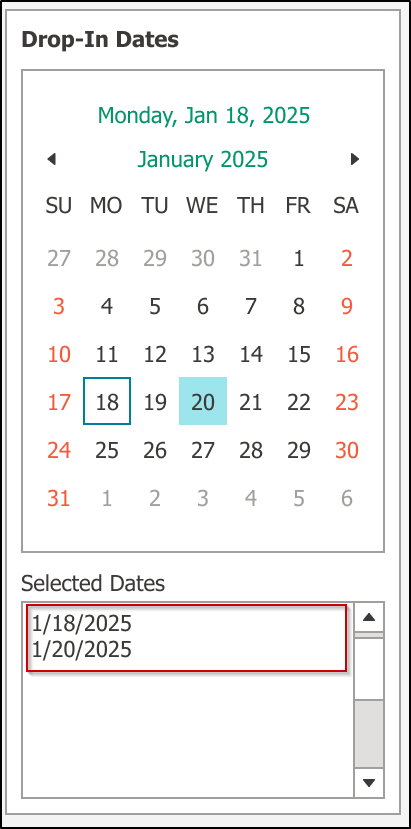
Use the calendar to pick one or more dates the child will attend.
Selected dates will appear in the confirmation box below the calendar.
To remove a date, simply click it again in the calendar.
Set Arrival and Pickup Times
By default, times are set to your center’s regular open and close hours.
You can change these times if the child will arrive earlier or leave later.
If you selected multiple dates, the form automatically sets the arrival time to the latest arrival time across all dates, and the end time to the earliest end time to fit all days.
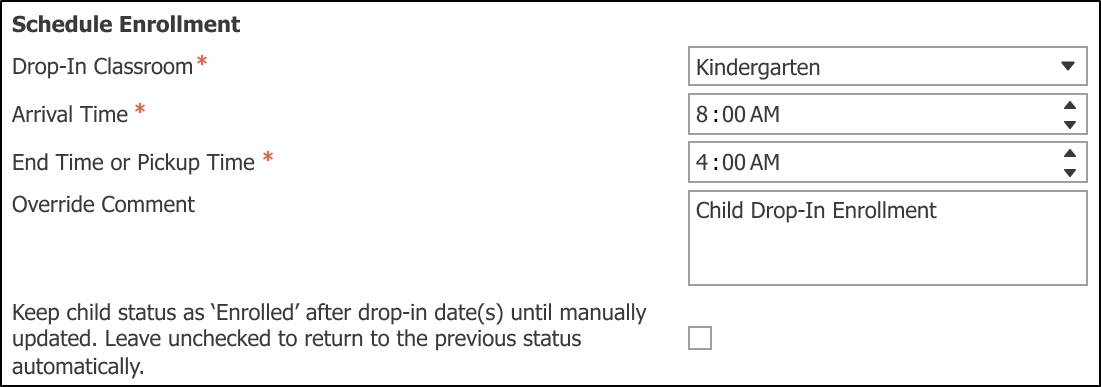
Choose a Classroom
The form will automatically suggest the child’s usual (primary) classroom.
If the child does not have a primary classroom assigned, this field will be empty—you must select a classroom before submitting the form.
Review for Special Cases
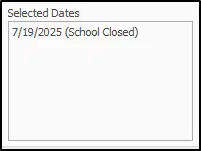
If you pick a date when the center is closed, the form will show a warning and mark that date as Closed in the date list.
If the child already has a schedule override on any selected date, you will see an error message and won’t be able to submit until you adjust the dates.
Understanding Enrollment Status
If you’re using Desktop with Engagement Functionality, review the best practices for syncing children from Desktop to Engagement when completing the form.
How Drop-In Enrollment Status Works
When you submit a drop-in form, the child's status automatically changes to "Enrolled" on the start date you selected. After the drop-in period ends, the status returns to what it was before.
Example: A child with "Pre-Registered" status uses drop-in care June 2-6, 2025. Their status becomes "Enrolled" on June 2 and returns to "Pre-Registered" on June 7.
This process works the same whether you select consecutive days (June 2-6) or non-consecutive days (June 2, 4, 6).
To Keep "Enrolled" Status:
Check the box "Keep child status as 'Enrolled' after drop-in date(s) until manually updated" if you want the child to stay enrolled instead of returning to their previous status.
If you check this box, the child will remain "Enrolled" after the drop-in period ends until you manually change their status later.

Drop-In Classroom Selection
Users can choose any classroom, and the drop-in form defaults to the child’s current primary classroom.
If the child does not have a primary classroom, then it will default to being blank and a classroom must be chosen to submit the form.
Setting Arrival & Pickup Times
Default Times: The arrival and end times will default to your center’s open and close hours, which are set under Procare Home > Configuration > System > Locations & Users > Regions & Schools > School > Hours of Operation.
Need help updating these hours? Learn how to set hours of operation.
Multiple Date Selection: When you select multiple dates with different operating hours, the system will:
Set the arrival time to the latest start time across the selected dates
Set the end time to the earliest end time across those dates
(This helps ensure consistency across varying center hours.)
Center Closures: If any selected date falls on a center closure, it will display as "Date (Closed)" in your Selected Dates list.
Go to System Configuration > Data Management > Scheduling > School Close Dates to manage closure dates. Need help? Read about setting school close dates.
Scheduling Behavior
Upon form submission, individual entries are created in Child Schedule Overrides & Absences with a default comment: Child Drop-In Enrollment.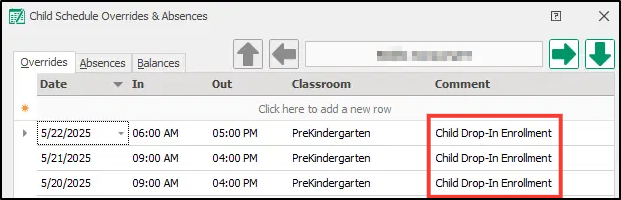
If a user chooses any date in the drop-in form where there already exists an entry on the Child Schedule Overrides & Absences form, then the user will receive the following error:
[Child Name] already has an override on one of the dates that you have chosen. Please review and try again.
If a user attempts to schedule a child on a date where the center is closed, then the user will receive the following error via popup:
The school is closed on a date you chose. Please review your school’s schedule before continuing.
Notifications
You can notify parents and scheduled teachers by email or SMS when submitting the form.
Email Notifications
To Parents:
Use the parent email dropdown to choose which payer(s) on the child’s account should receive a confirmation email. You may select one, multiple, or none.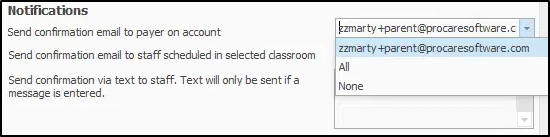
To Teachers:
To notify teachers, check the box labeled “Email all scheduled teachers” (located below the parent email dropdown). This sends a confirmation email to any staff scheduled in the selected classroom on any of the selected dates.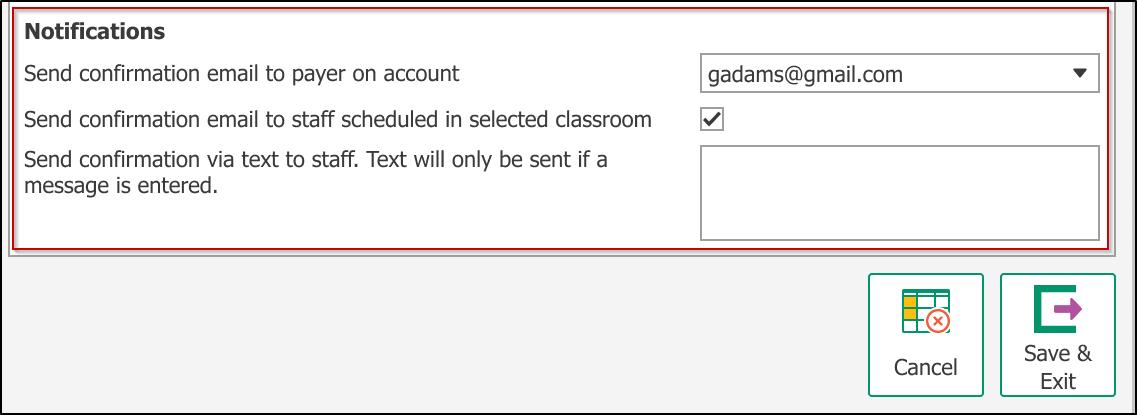
Example Scenario
A child is added to the Pre-Kindergarten classroom for May 21–23.
Teacher | Schedule | Communication |
|---|---|---|
Sandra | Scheduled on May 21 | Will receive email |
Gavin | Scheduled on May 23 | Will receive email |
Maria | Not scheduled that week | Will not receive email |
📌 Only teachers scheduled in the selected classroom on at least one of the selected dates will receive a confirmation email.
Text Message (SMS) Notifications
To send SMS messages to teachers, enter a custom message in the SMS Message field.
All scheduled teachers for the selected classroom and date(s) will receive the SMS.
To receive SMS messages, teachers must:
Be scheduled to work on the day(s) selected
Have an active employment status
Have SMS notifications enabled
If you use Procare Messaging Service:
No additional SMS setup is required.
Desktop & Engagement Functionality
The form is available to customers using Desktop, including those with Engagement functionality
Child Enrollment Sync from Desktop to Engagement Functionality
To make sure a child appears in Engagement, keep the “Keep Student Enrolled After Attending” checkbox selected. While children with an Enrolled status do sync to Engagement, if this box isn’t selected at submission, the system updates their status to Unenrolled (if the child wasn’t already enrolled), which prevents them from showing in Engagement.

FAQ
Can I schedule drop-in care for multiple children at once?
No, the form is accessed by clicking the drop-in icon for individual children in the Family Data & Accounting tab.
Why didn't a teacher receive the notification?
Teachers only receive emails if they're scheduled in the selected classroom on at least one selected date, have active employment status, and (for SMS) have SMS notifications enabled.
The times keep changing when I select multiple dates - why?
When selecting multiple dates, the system automatically sets arrival time to the latest start time and end time to the earliest end time across all selected dates for consistency.
Set the arrival and pickup times once you have selected all applicable dates.
If the classroom has a set ratio and is already full, will I still be able to schedule drop-in attendance?
Yes, the system will not prevent you from scheduling the child, even if the classroom is at full capacity based on its set ratio. However, availability reports are in development and will be added soon to help you make informed scheduling decisions.
Do I need to set up a specific rate for Drop-In care?
We recommend creating a dedicated Drop-In rate to apply to Billing Boxes to ensure accurate and consistent billing. If your tuition is based on schedules or attendance, consider setting up a billing formula specifically for drop-in rates. Read about creating or editing a billing formula.
You can also set up Drop-In rates as a standard amount—daily or hourly—depending on your center's needs. Read about setting up Standard Amounts.