Three options are available to add new students to your account.
On the website
In the app, or
If you have more than 30 students to enter, use our spreadsheet template with the student/parent data to bulk import into the system
Procare Desktop Customers
This option is not available. Refer to this article to learn more about bulk upload in Procare Desktop.
Add Students on the Web or in the App
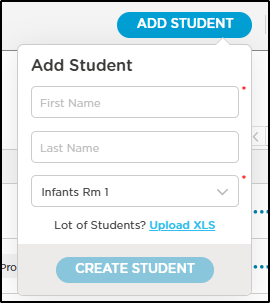
Go to My School > Students.
Click Add Student at the top right or use the Quick Actions option on the top right of each screen.

Enter the student’s first and last name.
Select the Room that they will be assigned to.
Click Create Student.
The Student will now display in your list of students on both the website and mobile devices. You can now invite the parents.
See the Key Fields to learn important details.
On the Home screen, click the
 icon in the upper-right corner.
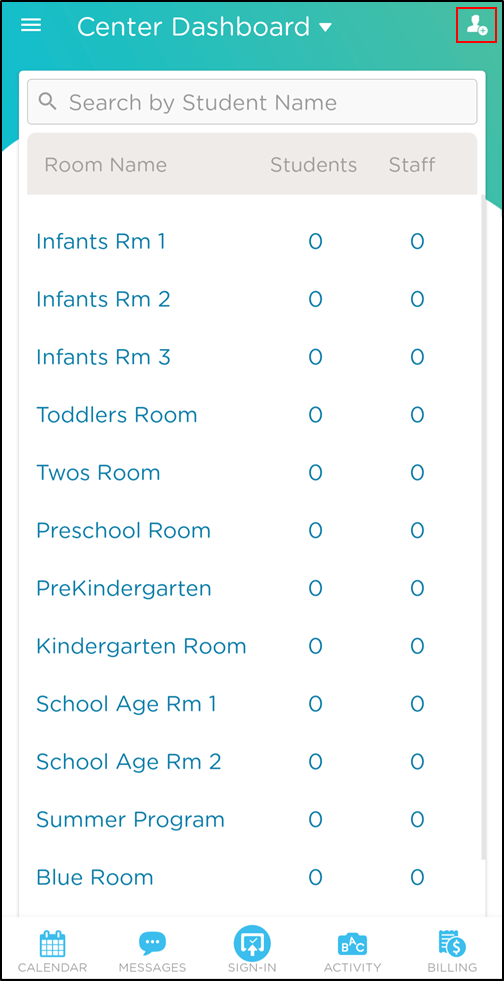
Select the room from the drop-down.
Enter the student's name
Click Add Student.
The student will be added to the room list.
Click the student's name to view/edit their profile.
Parent/Guardian PIN
Parents/Guardians will be issued a Sign-In/Out PIN and have access to the child's account to view daily activities or make online payments; authorized pickups will only have a Sign-In/Out PIN with no access to the child's account or payments.
Key Fields in the Student Profile
Student information can be entered as they are added or later by going to My School > Students.
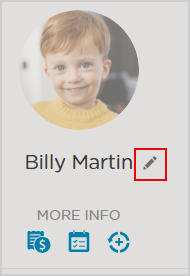
Profile Picture
To edit the picture, select the current photo and replace it with the new picture. File sizes are limited to 200×200 pixels.
Note
Once you add a photo, you cannot remove it. The only option is to replace it.
Name
The student name can be edited as needed.
Note
If you update the name, it will change everywhere in the software. Also, keep in mind that all the records and history are connected to this student profile. Best practices include not replacing this student profile with another student's profile or a sibling's profile.
Status
Schedule On Hold to Active.
Go to My School > Students.
In the search window, click Filter
 .
.Select the Room and Tags as needed. Select On Hold.
.png)
Click the Student’s name.
Select Schedule Activation
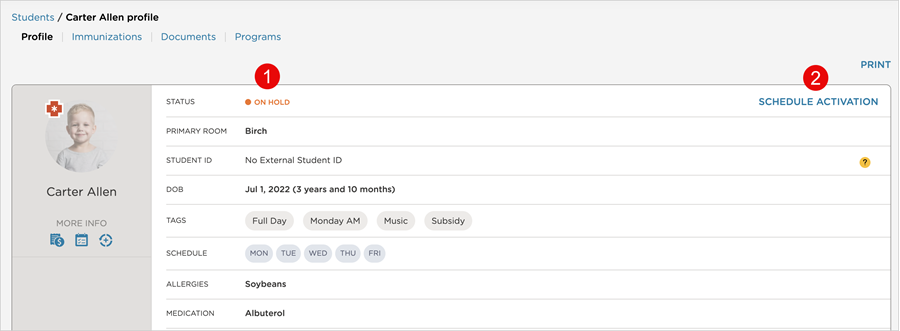
Choose the activation date.
Select the Room.
Select Schedule Activation.
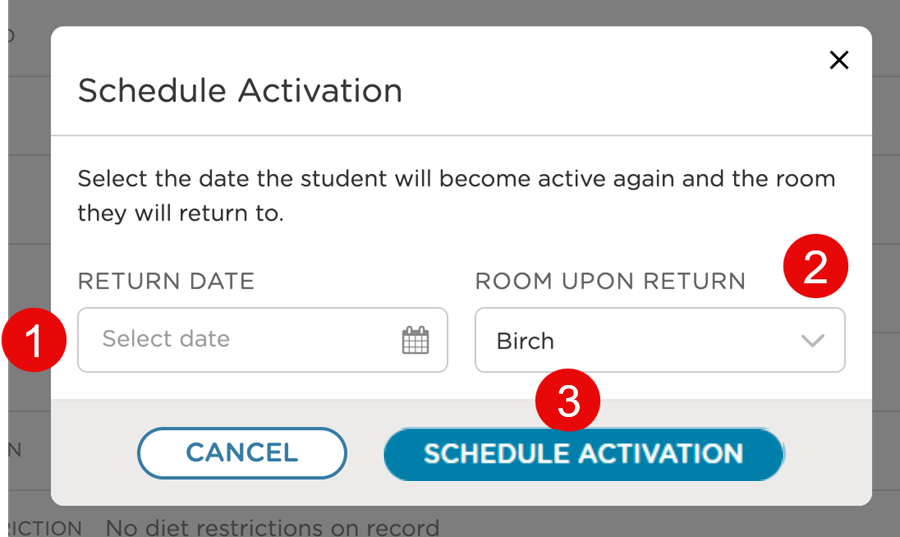
The scheduled activation will now appear next to the Upcoming Transitions field, labeled as On Hold Activation.

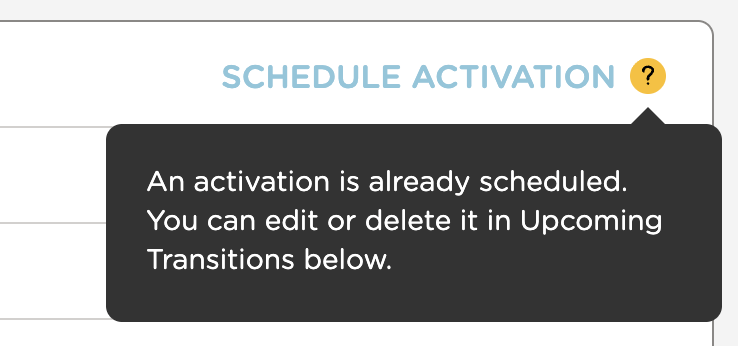
The tooltip provides information regarding the status.
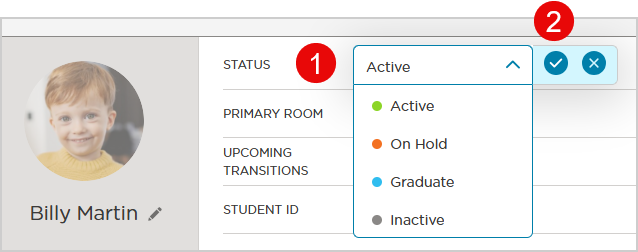
Change the status instantly.
Select the Status.
Select the
 .
.
Primary Room
The room can be changed from the student profile, but it is critical to understand the room designation and capacity. Refer to these articles for more information.
| Learn more about Rooms. Learn more about RoomRunner. |
To learn more about upcoming room transitions:
Note
Parents can only sign in/out of the primary room
Only the room designated as primary will display in reports
Upcoming Transitions
View any transitions or move plans for the individual student.

Learn more about RoomRunner Move Plans.
DOB (Date of Birth)
Entering the date of birth is important for maintaining accurate records (for example, immunization ) and planning and forecasting transitions.
Tags
Tags are customizable labels that make it easier to quickly filter and find specific groups of students, especially in larger programs.
Note
Tags are available in both the web and mobile platforms.
Schedule
Edit or revise the student’s schedule by selecting the day and AM or PM. Click to save.

Note
When adding a new student, the schedule defaults to the full-time schedule
For you to know, schedules impact:
LiveRoom status
Dashboard Sign In-Out analytics
RoomRunner dashboard
Programs
Allergies, Medications
These fields can be populated from a registration form.
To indicate no allergies you can enter any of the following: None, No, NA or N/A.
Note
Allergies and medications are displayed on the Emergency Cards.
Allergies are indicated throughout the software with this icon
.
Food Program
Appear on the Meal Tracking report
| Learn more about Meal Tracking and Reports |
Address
This field can be populated from a registration form.
Graduation Date
The Graduation Date automatically populates on today's date when the student enrollment status is updated to:
Inactive or
Graduate
This field can also be manually edited.
Additional Profile Fields
Profile fields can be created in School Settings or when creating or editing a registration form.
Parent/Guardians
Manage parent/guardian contact information.
Additional Authorized Pickup
There are two types of pickups you can set up:
Authorized Caregiver Pickups
Carpool Pickups
Physicians
Physicians can added or revised here. Create an Emergency Card Report for quick access to student and family information.
What student profiles fields will parent and staff see in app?
These student profile fields are available and designated by each app in the table below:
Staff App | Parent App |
|---|---|
Student profile picture | Student profile picture |
First name | First name |
Last name | Last name |
Assigned Room | |
Parents/Guardians | Parents/Guardians |
Additional Authorized Pickups | Family & Additional Authorized Pickups |
Schedule | |
Tags | |
DOB | DOB |
Medication | Medication |
Allergies | Allergies |
Notes | |
Street Address | Address Line |
City | City |
State | State |
Zip | Zip |