Task | Set up an online registration form so prospective families (leads) can apply to your center. After you review and approve their registration, their information flows directly into your Leads pipeline. |
Who can do this | Users with Full Access to the Leads permission |
Outcome when complete | A shareable registration form:
|
Before You Start
Make these decisions up front for a smoother process.
Choose a Recipient Type: |
|
|
Are you charging a registration fee? |
| Important Consideration:
|
Do you need pickup or waiver info on this form? |
|
Default Fields Collected on a Registration Form
Registration forms in Procare Online have four sections, starting with these default (built-in) fields:
Section | Default fields | Can you edit or delete the fields? |
|---|---|---|
Student Info | First Name, Last Name, Date of Birth, Allergies, Medication, Address Line, City, State, Zip Code | Required — edit only, cannot delete. These transfer to the student profile once a lead is enrolled. |
Parent Info | First Name, Last Name, Email, Mobile Phone | Required — edit only |
Authorized Pickup Info | First Name, Last Name, Mobile Phone
| Edit only
Note: Deleting this field is irreversible; adding it back will not transfer the data to authorized pick up details on the student profile. |
Policy & Waiver | Liability Waiver Photo Release Cancellation and Refunds | Required — edit only Edit or delete Edit or delete |
Field Information
You can add more fields on top of these default fields. See Step 4 - Add any form fields your center needs below. You can hide the Authorized Pickup Info or Policy & Waiver sections entirely if they are not needed for a form. See Step 5 - Simplify the form (optional)below.
Task - Build, Share and Edit Your Form
Building a form involves multiple steps and Procare Online has four distinct steps.

This article breaks the process into eight steps, splitting some into smaller parts for more detailed guidance. Want to jump ahead to a step? Click the link.
1 | Start a new form |
Go to Enrollment > Registration.
Click Create Registration. This opens a window to name the form and decide on form type.
2 | Name the form and select form type |
Enter a unique Form Name. Use a name that quickly identifies the form’s use or purpose. For example, Fall 2026 Infant Waitlist or Summer Camp Inquiry. You can update the form name later if needed.
Select the Recipient Type.
Recipient Type | RoomRunner Waitlist and the AI Waitlist Recommendations Agent |
|---|---|
| If you want to use the RoomRunner Waitlist and the AI Waitlist Recommendations Agent to manage the enrollment of potential students and incoming students, you will need families to fill out a leads registration form to enter your leads pipeline. Learn more about how RoomRunner can use AI recommendations to help you manage your waitlist. |
Leads
This is the standard choice for a leads/inquiry form and is used for prospective families who have not yet enrolled.
Active Students
Used for updating information on students already enrolled at your center.
If you want registrants to enroll directly as students, skipping the leads stage.
Stop and Consider
This article covers the Leads workflow. If you have decided on Active Students, go to the Student Registration Form article. The setup steps are similar, but that article is written specifically for the Active Students path.
Click Continue to proceed with the form builder or
Save & Exit to save the name and selected recipient type, and return later.
3 | Review and edit the default fields |
| If you are continuing with the form, skip to instructions. If you are returning to the form, go to Enrollment > Registration > locate the form > click More Options |

Four tabs containing default fields are available (refer to the table above Default Fields Collected on a Registration Form for details).
Student Info
Parent Info
Authorized Pickup Info
Policy & Waiver
Edit a Field | Delete a Field (when available) | Move a Field (when available) |
|---|---|---|
|
|
|
 .
. .
. .
.You can edit the required Student Info and Parent Info fields. Keep in mind that these fields are directly mapped to the student profile after lead conversion, so some edits are safer than others.
Safe edits for mapping — relabeling a field without changing what it collects won't disrupt the mapping. For example, changing First Name to First Name, Middle Initial still maps cleanly to the student profile's First Name field; you're just prompting families for a bit more detail. Similarly, adding a note like (Not Required) next to a field — for example, Allergies (Not Required) on an interest form — doesn't affect mapping either way, whether or not the parent fills it in.
Edits that can break mapping or lead to confusion later — changing what a field actually represents, or removing/renaming it in a way that no longer corresponds to its original purpose, can break the mapping to the student profile. If you're unsure whether an edit falls into this category, test it on a sample registrant before rolling it out broadly.
| To preview the form or see how it will appear to families, click Preview & Open Registration. |

 Create the Form.
4 | Add any form fields your center needs |
| If you are continuing with the form, skip to instructions. If you are returning to the form, go to Enrollment > Registration > locate the form > click More Options |
In addition to the default fields, Procare allows you to add as many form fields as needed to collect information from your prospective families. For example, ‘How did you hear about us?’ or ‘Preferred start date’.
Pay attention to which tab you add the form field to — the response will be tied to that tab's profile.
Student Info
Parent Info
Authorized Pickup Info
Policy & Waiver
Questions added here are asked for each student
Questions added here are asked for each Parent/Guardian
Questions added here are asked regarding the Authorized Pickup
Questions added here are only asked one time per form, are not tied to any profiles, but always viewable on the completed form
On any tab, click Add Form Field.
For each new field, choose the field type. For more details about the field types see Choose a Field Type below:
Short Answer
Checkbox
Dropdown
Date Picker
Paragraph
Line Divider
File Upload
Do you want the data saved to profile? (only available for the Student Info and Parent Info tabs):
Yes if you want this answer to appear on the lead's profile and optionally transfer to the student’s profile upon enrollment.
Choose a profile field
Select an existing profile field from the list that you previously created or
Click Create Profile Field to add a new profile field that you can use in this form
Field Name - enter an easily identifiable field name that will be listed on lead and student profiles.
Description - details here to help other staff understand the field’s purpose
Transfer Profile Field Data
When creating a new Lead field, check the box labeled ‘Transfer this profile field to Active Student Profile upon enrollment’ if you want the registrant's details to carry over to the student profile upon enrollment. If you do not need to see the registrant’s response on the student profile later, you can leave the box unchecked.

Learn more about Profile Field Mapping.
Click Save.
If No is selected, registrant responses will be viewable in the submitted PDF of the registration form.
Field Details
Options vary by field type. See Choose a Field Type table below.
Click Add Form Field to save.
Move a Field (when available) |
|---|
|
Choose a Field Type
Use/Example | Additional Notes | Configuration Options | ||||||
|---|---|---|---|---|---|---|---|---|
A single, brief answer:
| Registrants can enter anything into this field. |
|
Use/Example | Additional Notes | Configuration Options | ||||||
|---|---|---|---|---|---|---|---|---|
| Add multiple checkboxes in a row to create a multi-select list. |
| ||||||
| ||||||||
Use/Example | Additional Notes | Configuration Options | ||||||||||
|---|---|---|---|---|---|---|---|---|---|---|---|---|
|
|
| ||||||||||
Use/Example | Additional Notes | Configuration Options | ||||||
|---|---|---|---|---|---|---|---|---|
A response that requires a specific date to be selected, such as a birthdate or start date. | Registrants must select an exact date, not a date range. Add two date pickers in a row to allow registrants to provide a date range. |
|
Use/Example | Additional Notes | Configuration Options | ||||||
|---|---|---|---|---|---|---|---|---|
| Informational only and does not allow for a response. |
|
 where you can insert:
Use/Example | Additional Notes | Configuration Options | ||||||
|---|---|---|---|---|---|---|---|---|
Visually separate sections of the form. | Adding this form field creates a horizontal line between fields. It can be moved or deleted at any time. |
|
Use/Example | Additional Notes | Configuration Options | ||||||
|---|---|---|---|---|---|---|---|---|
Upload immunization records, photos or other files. |
|
|
| To preview the form or see how it will appear to families, click Preview & Open Registration. |
5 | Simplify the form (optional) |
| If you are continuing with the form, skip to instructions. If you are returning to the form, go to Enrollment > Registration > locate the form > click More Options |
The Authorized Pickup Info and Policy & Waiver sections can be hidden in your form if they are not needed. For example, your center may not need a pickup authorization on an interest form. If you need the hidden section later, you can show it again. In our example, we are hiding the Policy & Waiver section.
Click the Policy & Waiver tab.
Click
 . A message displays to indicate the section is not visible to parent/guardian filling out the form.
| To preview the form or see how it will appear to families, click Preview & Open Registration. |
Note
If you have already collected the information in the section you have elected to hide, the data is hidden but still retained.
Select from these options to continue: | ||
|---|---|---|
Located at bottom of window. | Located in the top menu. | Located in the top menu. |
Click Save As Draft to save and exit the form builder. | To charge a registration fee: Click | If you chose not to charge a registration fee for this form, click |
6 | Add a registration fee (optional) |
| If you are continuing with the form, skip to instructions. If you are returning to the form, go to Enrollment > Registration > locate the form > click More Options |
Note
If the lead is enrolled and becomes a student, registration fees collected for leads through the leads registration form:
do not appear on family accounts later
are not visible to parents/guardians on their account
If the registrant is accepted and added as a lead, registration fees are visible in:
Enrollment > Leads > Amount column
Enrollment > Leads > select the lead > Lead Details > Student Info > Payment
Click the payment amount
and view the Leads Payment details.
Active students registration fees are visible in:
Enrollment > Registration > Submitted Registrations
Billing > Accounting > Select Family and Billing > Accounting > All Transactions
Billing reports that reference transactions on a family account, for example, the Categorized Transaction Summary Report and the Transactions Reports
Another Consideration
Alternatively, for approved registrants collected from Active Students registration forms, registration fees are handled differently: invoices and payments appear directly in Family Accounts. Refer to the FAQ - What is the difference between a Leads form and an Active Student form? below
With Procare Online you are able to:
add a registration fee to each form
determine how much to charge per student added to the form
You can return to this window at any time to add, remove or edit the registration fee.
Click
 Add Payment Method. If you want to charge a registration fee for this form:
Do you want to collect registration fees?
No is the default, select Yes to set up the fee. You can select No at any time to disable the collection of the registration fee.
If Yes,
Step 1. Set up your billing account
If billing is not yet set up and your center would like to take registration fees through Procare, call customer support for assistance.
Step 2. Student Registration Fee - enter the fee.
The fee applies per student; a family registering multiple children will be charged for each one. The form cannot be submitted until payment is complete.
Learn more about registration fees.
Select one of these options to continue: | |
|---|---|
Save | Share |
Click Save As Draft to save and exit the form builder. | Click |
7 | Share the form |
| If you are continuing with the form, skip to instructions. If you are returning to the form, go to Enrollment > Registration > locate the form > click More Options |
Configure the share options so families can view and complete the form. You can return to this window at any time to:
copy the link or button
share the form with more leads directly through Procare Online
Click
 Share & Select Recipients.
When you are editing the form, all saved edits take effect immediately and update the form in real time. You do not need to resend the form, update the link, or update the embedded button.
Three share options are available:
Share the Form > Link
Click
 to copy the form's URL.
 Paste into an email, text, or the communication you use to reach families directly. The registration link can be shared with anyone or embedded on your website, regardless of recipient type.
Share the Form > Embed a button
Click
to copy the button’s embed code. Paste in to your website's HTML. Common placements include:
sidebar
site header
homepage body
Use the button ‘as-is’
Edit the text before or after pasting into your website
Build your own button
Send the Form > Send To:
Click Add Leads.
Select which existing leads should receive the form.
Search by name
Click
 to filter leads by:
anticipated primary room
age
expected start date
lead creation date
or lead status
Click Apply.
Click Continue to confirm your selection. This step selects the recipients. The form is not actually sent until you open the registration form in the next step.
Reply To email address: |
|
|---|
The form recipient type determines who you can send the form to directly. Remember, deciding on the recipient type is the first step in creating the form.
Leads form can only be sent to existing Leads
Active Students form can only be sent to existing Active Students
The form’s recipient type does not restrict who can complete the form. Anyone with the link can access the form regardless of recipient type. See Share Form Results for more details.
Select from these options to continue: | |
|---|---|
Save | Preview |
Click Save As Draft to save and exit the form builder. | Click |
If you selected leads to share this form with, you must click Preview & Open to continue. Then click Open & Send Form to send the form directly to the selected leads through Procare Online.
View Form Recipients List
Option 1 | Option 2 |
|---|---|
Go to Enrollment > Registration
| Go to Enrollment > Registration.
|
 .
.8 | Preview the form |
| If you are continuing with the form, skip to instructions. If you are returning to the form, go to Enrollment > Registration > locate the form > click More Options |
We recommend that as you build the form, you preview it to see exactly what the families see. This final preview will help you make sure you have everything you need.
Click
 Preview & Open Registration.
Review for edits or additions.
To make an edit, click
 Create the Form.
Make the desired edits, see Review and edit the default fields, add any form fields your center needs, or simplify the form (optional) instructions above if needed.
Click
Preview & Open Registration to review your edits.
When you are ready to make the form live and automatically send it to all selected leads from the previous step:
Click Open & Send Form at the bottom of the window. This does two things at once:
It opens the form so registrants can fill it out and submit it. The link and embedded button begin working immediately.
It sends the form to any leads you selected in the previous step.
Repeat steps 7 and 8 at any time to send the form to additional leads.
Open & Send Form
Each time you click this option, the email with the registration form is sent to all new leads you selected in
Share & Select Recipients.
Registration Forms Dashboard Overview
Go to Enrollment > Registration > Registration Form.
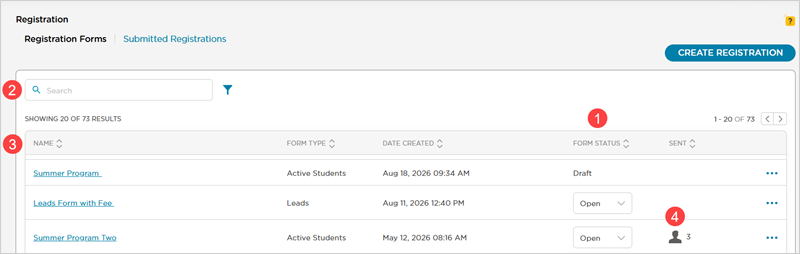
Check the status of your form.
Search by form name or filter the form list by:
Status
Sent status
Created date
Click the column header to sort in ascending or descending order by:
Name
Form Type
Date Created
Form Status
Sent Status
Hover to view the names of the individuals sent the form.
Form Status
Open - the form is live and collecting responses when the form status is set to Open.
Closed - If you need to pause submissions without deleting the form, set the status to Closed. The link stops accepting new responses until you reopen it.
For a full explanation of each status and instructions on how to update, review the table below.
Status | What it means | To change the status |
|---|---|---|
Open | The link is live. Families with:
can complete and submit the form. | To close the form:
|
Closed | The form is currently unavailable to families. Anyone who navigates to the form via the:
sees the message, ‘This registration form is not available at the moment.’ | To open the form:
|
Draft | The form is:
Anyone who navigates to the form via the:
sees this message, ‘This registration form is not available at the moment.’ |
To open the form:
|
After the Family Submits the Registration Form
If no potential duplicates of the lead are found, the lead automatically appears in Enrollment > Leads.
If Procare Online detects a potential duplicate of an existing lead, the lead appears automatically in Enrollment > Registration > Submitted Registrations for review.
A daily summary email of new registrants is sent to center admins with full access to leads once, at the beginning of the day.
A copy of the submitted form, along with any uploaded documents, is stored in Enrollment > Registration > Submitted Registrations.
If the registrant is accepted, the submitted form and any uploaded documents can be viewed in Enrollment > Leads > select the Lead > Profile > Documents.
Learn more about managing registrants.
Edit the Form
Go to Enrollment > Registration.
Locate the form, click
 .
.Select Edit.
This reopens the form builder.
Edit Form Name
Hover over the form name
Click Edit
 .
.
Note
If you choose to edit the name, keep in mind that the PDF submitted form will still refer to the previous name. In Enrollment > Registration > Submitted Registrations, the form name will be updated to the new name. If you need a form with the same fields, copy the form, see Copy or Create a Form Based on an Existing Form.
Select any step to continue, jump ahead or return to a previous step. Refer to the sections above for guidance regarding fields, sharing and opening a form.
Select from these options to continue: | |
|---|---|
Save | Preview |
Click Save As Draft to save and exit the form builder. | Click |
Discard Edits Without Saving
Click a menu option or any option outside the form builder. A message displays:
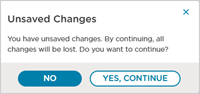
Yes, Continue - select to discard your edits and leave the form builder.
No - select and the message window closes. Scroll to the bottom of the window, click Save as Draft to exit after saving.
Important Notes
While editing an Open form, the form is live and accepting registrants. We recommend closing the form if you do not want to accept more registrants until the edits have been made. See Form Status above to close the form.
When editing the form, all saved edits take effect immediately and update the form in real time. You do not need to resend the form, update the link, or update the embedded button.
Copy or Create a Form Based on an Existing Form
In some cases, it's more efficient to copy an existing form and make minor updates rather than starting from scratch.
Go to Enrollment > Registration.
Locate the form, click
.Select Copy.
Enter a unique name.
Select an option:
Save & Exit - to create the form and return to it later. Procare Online returns to the Registration form list.
Copy - to create the form and begin editing.
Important
These steps create a duplicate of the registration form you copied, including registration type and all added form fields.
Payment settings are set to ‘off’ by default for the copy.
No leads will be selected in
You cannot edit the registration type.
You can edit:
all other settings
the recipient list to automatically receive the form
form fields to make this form unique
The copy of the form is in Draft status when created and can be opened when ready.
Delete a Form
If your center:
no longer needs to collect registrants with a registration form
will not use the form again, either to collect new registrants or as a copy for new forms
you can delete the form.
Deleting a form is irreversible. Make sure you are certain that your center no longer needs it for any reason. You can also choose to edit the name of a form to indicate that it is archived or no longer in use. See Edit a Form Name..
Deleting a form does not remove any registrant data. All submitted registrants, regardless of where they are in the approval process, will remain in your software on the Enrollment > Registration > Submitted Registrations page. The form name will be updated to include [FORM DELETED].
Go to Enrollment > Registration.
Locate the form, click
.Select Delete.
Select an option:
Yes, Delete - to continue deleting. The form will be permanently deleted.
No - the form is still available.

FAQ - Leads Registration Form
Form Types
What is the difference between a Leads form and an Active Students form?
Leads Form
For prospective families.
Accepted registrants who filled out a lead form will create a new Lead profile in your Leads pipeline. The RoomRunner Waitlist consists of leads, so keep this in mind when deciding where you want registrants to appear.
The Send Form feature can only be used to email the registration form directly to Leads. This restriction applies only to the automatic send feature — it does not limit how the registration link itself is shared. The link can be sent to anyone, or embedded on your center's website, regardless of recipient type.
Registration fees collected through the leads registration form do not appear on family accounts later if the lead is enrolled and becomes a student. They are also not visible to parents/guardians on their account if their child becomes a student. Lead form registration fees are visible (if the registrant is approved) in:
Enrollment > Leads
Enrollment > Leads > select the Lead > Profile
Enrollment > Registration > Submitted Registration
Reports > Billing > Registration Payments
Active Students Form
Can be used for both prospective families (to skip the Leads stage altogether) and to update information for currently enrolled students.
Accepted registrants who filled out an Active Students form will either create new Student profiles or update current Student profiles.
You can always update student enrollment status once their profile is created. If the registrant is not yet active, they can be put On Hold or made Inactive.
Learn more about Edit Student Enrollment Status.
Move plans can still be made for students in the On Hold enrollment status.
Learn more about Activation instructions in the RoomRunner - Create and Manage Move Plans.
The Send Form feature can only be used to email the registration form directly to students with an Active enrollment status. This restriction applies only to the automatic send feature — it does not limit how the registration link itself is shared. The link can be sent to anyone, or embedded on your center's website, regardless of recipient type.
Registration fees collected for students through the active students registration form will appear automatically as an invoice and payment on the family account, even if the student is not currently active and is added as a student during the registrant management process. Parents/Guardians will see the registration invoice and payment on their account. Active students registration fees are visible (if the registrant is approved):
Enrollment > Registration > Submitted Registration
Billing > All Transactions
Billing > Accounting > select a family > Family Transactions
Reports that reference transactions on a family account, for example, Categorized Transaction Summary Report or Transactions Reports
Should new families always use the Leads form first?
Not necessarily. Use the Leads form when you want to track prospects through an inquiry stage before they enroll. For example, if your center follows up with tours, waitlists or an application review before accepting a family. Use the Active Students form for a new family instead if you want them enrolled directly, with no separate leads step. See the FAQ above for more specific details regarding each form type.
What is the difference between the two recipient types when setting up a new form?
Recipient Type Leads creates a Lead profile that you can later convert to an Active Students once they are accepted. Recipient Type Active Students creates the enrolled profile immediately and there's no intermediate Lead record to manage or convert.
Form Building
Can our center create multiple forms?
Yes. You can create multiple forms with different fields and requirements. For example, you could have a short inquiry form for general interest and a longer enrollment form for families further along in the process.
Can I hide the pickup and waiver sections when creating the registration form?
No. You can hide Authorized Pickup Info and Policy & Waiver on any form. See Fields - review and edit the default fields.
Can registrants complete or sign paperwork through the form?
The best way to accomplish this is by combining a paragraph-form field and a file-upload form field.
First, add a paragraph form field with instructions on completing the document, for example, ‘Download and complete the attached immunization form. Then, upload the completed form below.’ Give registrants access to the document via a link or by attaching it (click the plus sign in the text section and select the ‘upload file’ option).
Next, add a file upload form field right below the paragraph form field you just created.
Registrants will be able to access the document, fill it out by hand as requested, and then upload it back to the registration form.
Alternatively, you can send eDocs to families.
Learn more about Documents.
Can I set up a form field so families can indicate:
* which schedule they would like
* request any number of schedules
* save their responses
to the lead’s profile? The dropdown form field doesn’t give me the option for multiple answers when I choose to save the data to the lead’s profile.
* which schedule they would like
* request any number of schedules
* save their responses
to the lead’s profile? The dropdown form field doesn’t give me the option for multiple answers when I choose to save the data to the lead’s profile.
There are two options to make sure answers are selected from the available options:
Option A: Multiple Checkboxes (better for when registrants can create their own schedule out of various options)
Add a paragraph form field with a field label that provides the title for this field (for example, ‘Preferred Schedule’) and text that provides instructions or more clarification. You could also use the text area to attach or link to a document with more information.
Create schedules as form field checkboxes. Each schedule is a checkbox. In order to make the responses easier to review on profiles later, we recommend adding the name of the field along with the schedule to the field label box (for example, ‘Preferred Schedule - Monday AM, Preferred Schedule - Monday PM, etc.). Leave the checkbox for ‘This is a required field’ unchecked; otherwise, registrants will be forced to select every schedule to submit the form.
Option B: Multiple Dropdowns (better for when registrants should choose from preset options)
Add a paragraph form field with a field label that provides the title for this field (such as ‘Preferred Schedule’) and text that provides instructions or more clarification. You could also use the text area to attach or link to a document with more information.
Add a dropdown field for each schedule option, with a field label like ‘Preferred Schedule 1st Choice’ or ‘Preferred Schedule Day 1.’ Make sure all schedule options are provided in each dropdown field or that they are divided up by day, for example, ‘Monday AM,’ ‘Monday PM’, and ‘Monday Full Day’.
Can I edit form fields when I have selected Yes to the question 'Do you want the data saved to profile?'
To edit you will need to edit the Profile Field. Go to School Settings > Profile Fields > locate the profile field > select More Options > Click Edit.
Make the necessary edits.
Profile Fields and Saved Data
What happens to form data that is not saved to the profile?
It's still recorded but not visible on the lead or student profiles. You can find the submitted registration form as a PDF copy in:
Enrollment > Registration > Submitted Registrations
If approved, Enrollment > Leads > select the Lead > Profile > Documents
If enrolled as a student, My School > Students > select the student > Profile > Documents
Why do I not see a profile field that I previously created. It was an option in the dropdown and I selected ‘Yes’, to ‘Do you want the Data Saved to Profile?’
This is due to the field type. For example, if you selected Short Answer as the added form field, Procare will provide profile fields in text format. Short Answer is a text field and can only be added to profile fields that are text fields.
Registration Fees
Can our center collect a registration fee through the form?
Yes. Use the Add Payment Method option during setup. See Payment method - optional.
What if the same family submits the form twice?
Procare flags likely duplicates in Enrollment > Registration > Submitted Registrations.
Learn more about managing duplicate leads.
Sharing and Submissions
Can I email the registration form directly to families in Procare Online?
Yes. The built-in email share option is tied to the form's recipient type. A Leads form can only be emailed to Leads and an Active Students form can only be emailed to Active Students. This only affects the in-app email feature. The registration link itself can be shared with anyone (email, text, social media, etc.) and can also be embedded on your website, regardless of which recipient type you chose. To learn how to send this email and access other share options, see Share - Share & Select Recipients.
Legacy Form (Parent Registration Form in Enrollment)
What happened to the 'Setup Parent Registration Form' that was available in Enrollment > Configure?
The Setup Parent Registration Form under Enrollment > Configure is our legacy registration form and is not available for accounts created after the new Registration feature was released. Refer to the instructions above to set up a form with our Registration feature.